
Hi there! I’m Jackie from Every Pretty Thing. My favorite crafts are decoupage and easy sewing projects, but my most recent fascination is making fabric flowers–they’re so different based on which fabrics you use, how many times you singe the petals, what shapes you cut…it’s all up to you and it always looks great (which is good for someone with, ahem, interesting cutting skills like mine)!
I made a little tutorial for fabric flower elastic headbands. I just got some gorgeous periwinkle and light gray chiffon in, so that’s what I used. Other chiffons curl up more than this one did, but this makes for a good, low-key but still gorgeous flower.
Here’s what you need:
- Chiffon: 1/4 yard makes a ton of flowers, so you just need a small piece. We’re using 2 colors here.
- Bead or button for the center of each flower: I used 3 glass pearl beads in this project.
- Scissors: I use small, sharp scissors so I have more control over the shape.
- Needle and thread: Make sure the needle is small enough to fit through the bead or button.
- Adhesive: I used E6000.
- A candle: This is to singe/melt the edges of each petal.
- TV or Netflix: This is 100% necessary. Trust me. Turn it on before you begin.
First, cut out your shapes. I did 4 circles for each of the 2 biggest flowers and 3 for the smallest. Make sure each is a little smaller than the one before it so they can nestle into each other once they’re singed.

Don’t fret if your circles aren’t perfect. In this case, “It adds character!” is not a euphemism for “That’s hideous!” Real flowers aren’t perfect circles, so these don’t need to be either.

Next, light your candle and hold each petal near (not in! It’ll catch on fire. Don’t ask me how I know, please) the flame, turning the circle to get even melting. You may want to use tweezers to hold the petals, especially the tiny circles. Burned fingernails hurt more than you’d think (Again, don’t ask how I know…). With poly-chiffon, if you run it around twice instead of just once it’ll curl up into gorgeous flowery-ness. Mine (silk chiffon, I think?) just melted more awkwardly! Lucky me. Arrange them into some aesthetically pleasing formation, like this:

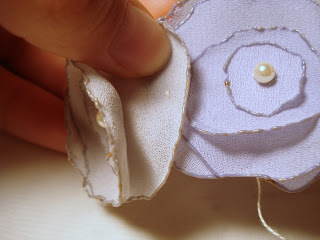
Insert the threaded needle from the bottom (it helps if you squish the center of the flower and slide it off the surface so you don’t mess up your pretty arrangement), thread a bead or button onto the needle, then finish the stitch. Tie it off under the flower. Repeat with the other two flowers.

Next, line up the finished flowers prettily. It doesn’t need to be a perfectly straight line, just whatever looks best. Stitch them together using one hidden stitch. Sewing the stitch into the bottom-most layer of the flower hides it under the other layers, so that you can’t see it from the outside.

Once you have a pretty sewn-together flower grouping, get out your elastic headband and use the adhesive to secure it to the headband. Once it’s pretty steady, stitch (again on the bottom layer of the flower so it’s invisible) the grouping to the headband. One stitch on each side should be sufficient. I know the adhesive seems a little unnecessary here, but it’s a bit of an ordeal to sew it on there otherwise. Plus, a little extra security is never a bad thing. The E6000 is a jeweler’s adhesive that is flexible, so the stretching of the headband won’t upset it.

Now you have a gorgeous headband that you made yourself! Go strut around and tell everyone who will listen (or am I the only one who does that?)!


Experiment with other types of chiffon (and silks and satins if you’re so inclined), pretty shapes, dozens of layers, only two layers, whatever strikes your fancy. The fabulous thing about these is that they’re very difficult to make ugly. What else can you think of to add a fabric flower to? I’ve done bobby pins, magnets, and tiny ones on rings.
Jacquelyn Kyle is a graduate student who studies mortuary archaeology of the prehistoric British Isles. She started Every Pretty Thing in September of 2010, and blogs about new products and whatever else strikes her fancy here. Like her on Facebook to get fans-only specials.


Thanks for the great tutorial Jackie! The headband looks amazing! I really want to try this while watching Netflix of course 🙂
I think you’re doing a fantastic job. I appreciate your article. Thank you very much for provide good information.
Regards for all your efforts that you have put in this. Thanks for this post.
I like the flower headband. Its so easy to make them. I also try to make it.
I really enjoy simply reading all of your weblogs. Simply wanted to inform you that you have people like me who appreciate your work. Definitely a great post. Hats off to you! The information that you have provided is very helpful.
florists online